TOPS-MATE INT'L CORP.
Ultrasonic
Welding Machine operation instruction :
If your machine is not assembled the
upper mold and the based mold. Pls read all operation instruction.
If you
receive the machine with upper mold and base mold assembled and with pre-setting
completion. You may read the
section 1 only.
Section
I
ˇV A. All Plugs & cables in before Power on AC
220- 230V
|
|
A. |
 |
1.
Plug in the compressor air tube,
which is located at
the back of machine.
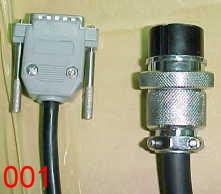
2.
Plug in the output cable connector, which is at the back of
control box.
(Ref.
001)
3. Plug
in the control 5-pin cable, which is at the back of
control box.
(Ref.
001
)
|
| B. |
 |
| c. |
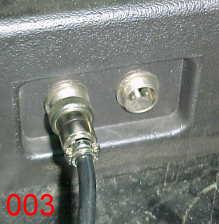 |
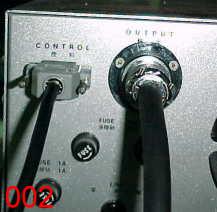
4.
Plug in the control 5-pin cable connector (left side), which is at
the back of the machine and under the compressor air tube. (Ref.
003)
5.
Plug
in the foot pedal cable socket (right side), which is at the back of the
machine and under the compressor air tube. (Ref. 003)
6.
Plug in the 220v Ac power
plugs.
Please follow the next to Section III :
ˇ@ |
ˇ@
| Section II ˇV All adjustments
for the a. The upper/bottom mold. b. Ultrsonic
output power. |
| A. |
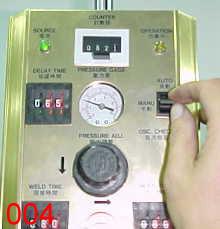 |
1. Please Swich of the auto/manu ON THE MANUAL position
(Ref. 004) ˇV
not at AUTO position while you need to adjust
the UPPER/BASE MOLD.
|
| B. |
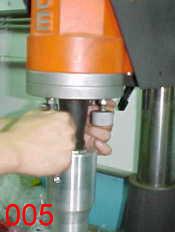 |
2.
Lock the four horizontal screws before assemble the
upper
mold. (Ref.005)
|
| C. |

ˇ@
|
3.
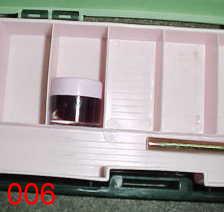
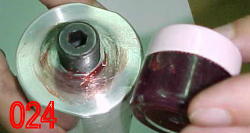
Brush the lubricant-oil
(Ref. 006, 024, 025) on the top of
upper mold before assembling-revolving tightly with machine
mold to avoid it oxidizing on the top of the upper mold, the
oil usage is for easy to separate when you take off the
upper mold.
This oil is included in the toolbox!
|
| D. |
ˇ@
|
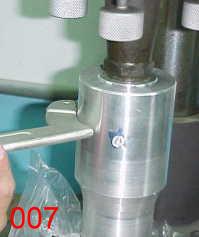
4.
Put the upper mold into the machine, and revolve it
against
the clock direction till it can not be revolve. Then
use the
bar tool (Ref.007) which in the tool box, to push or
strike
twice on the bar tool to ensue the upper mold is
revolved
complete tightly!
5.Loosen the four horizontal screws, for
adjusting the right
position of upper mold.
|
| E. |
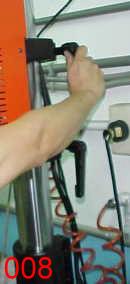 |
6.
Loosen (downward direction) the 2 handles on the rear side
of the machine where located on big stainless tubing before
adjusting (Ref. 008), in order to adjust the height of upper
mold later! THIS
IS VERY IMPORTANT!!!
|
| F. |
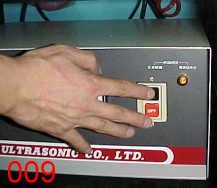 |
7.
Turn on the power switch which on the right side of
the
control box. (Ref. 009)
|
| G. |
|
8.
Set the auto/manual switch controller at the manual
function. (Ref. 004)
9.
Press the ˇ§MOTOR UP SWITCHˇ¨ to raise up the upper
mold to avoid crash / touch the bottom mold while adjusting
the 2 molds. (Pressing the ˇ§STOP UP
buttonˇ¨ can raise the
upper mold immediately)
|
| H. |
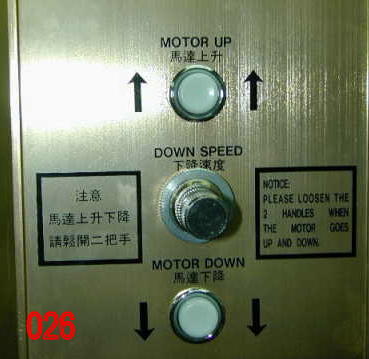 |
10.
Press the ˇ§MOTOR DOWN SWITCHˇ¨ to adjust the
DISTANCE of the upper mold with case!, this
ˇ§MOTOR
DOWN SWITCHˇ¨ is controlled down- adjusting the
height
of the mold. (Ref. 026)
11.
Place the bottom mold, and secured-fix the bottom
mold
to the right position.
12. Put the black case on the bottom mold, start to
adjust
height of the upper mold with case while the
upper mold is
down. The best position for the upper mold is
enable to
have the perfect glue-connection points.
|
| I. |
|
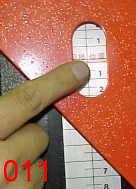
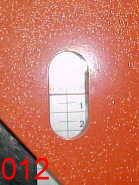
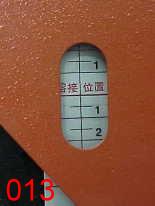
13.Please note the perfect
welding -connection points means
the real line (please refer ˇ§real lineˇ¨ on
the picture of
035SˇK.) of the machine is superimposed
on the standard
red line, which is on the right side of the
machine. (Ref.
011,012,013) Please note the real line can be
higher than
the standard line, but cannot be lower than the
standard
line. If the real line is lower than standard
line, the situation
will be the upper mold have a big distance with
case, it
means that upper mold can not touch the black case
while
molding.
14.
After finishing adjustment the height-distance of
the
upper/bottom mold, Please screw-revolve the four
horizontal screws tightly.
ˇ@ |
| J. |
|
15.
Push-up to
Lock
the 2 handles on the rear side of the
machine that located on big stainless tubing. (Ref. 008)
16.
Start to use the screws to secured-fix the bottom
mold
onto the right position tightly.
ˇ@ |
| K. |
|
17.Set the auto/manual switch controller at the auto
function.
(Ref. 004)
|
| L. |
ˇ@
ˇ@
ˇ@
ˇ@
ˇ@
ˇ@
ˇ@
|
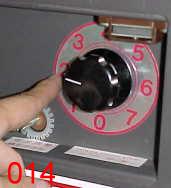
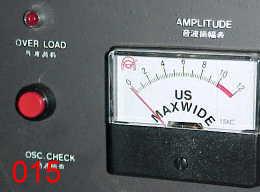
1. Turn
the POWER
REGULATOR to ˇ§section 2ˇ¨ for
step-down the ultrasonic power (Ref. 014) in order to adjust
the suitable ultrasonic. Then turn the small controller sonic
stick-bar to right or left side, and at the same time to
press
the ˇ§OSC. CHECKˇ¨ to get the smallest ultrasonic by less
than 1 Ampere - The
perfect output of ˇ§APLITUDEˇ¨ is
under
1 ampere ˇV
ˇ§APLITUDEˇ¨ (Ref. 015). Press
the
OSC.CHECK button within 3
seconds and release to
check if it is under 1 ample,
User can press several
times for testing, but each
time can not press the
OSC.CHECK button more than 3
seconds.
If
the sonic is too high, the red light of OVERLOAD will
be flashed to warn
user that it is over the limited
ampere of ultrasonic.
That means the ultrasonic is too higher, it has to
be
adjusted down.
|
| M. |
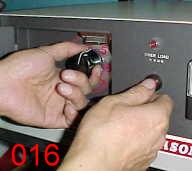 |
NOTICE: The
power regulator and ˇ§OSC. CHECKˇ¨ can NOT
be adjusted at
the
same time. (Ref.
016), user can
not SWITCH the POWER REGULAR &
PRESS
OSC.CHECK at the same time!!
ˇ@ |
Quality Judgement :
How
to check the finished product is perfect ? There is not any scar on the upper surface of finished black
case.
How
to adjust when the surface of case has scar: Adjust the diagonal
horizontal screws of the upper mold to balance the horizontal parallel of two
sides of the upper mold.
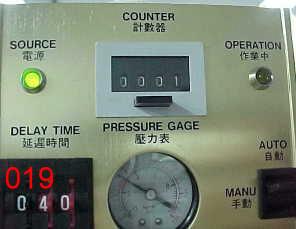
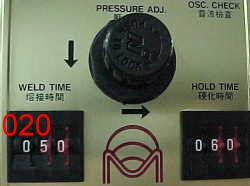
| Section III - Explanation of the
gauges time setting (Ref. 019, 020) |
Pls
refer the photo sent by next e-mail of your machine time setting. The below
photo is just for your reference.
1.
Delay Time: The needed time of the released ultrasonic power while press
the 2 ultrasonic buttons, which start to melt. Please kindly note that the upper
mold will be moving down at the same time to wait for the release ultrasonic
power.
2.
Mold Time: The consuming time of the black case needs to be melt.
3.
Hold Time: The time for cooling the black case when the upper mold stays
on the black case, and to wait for the case to get at connection harden
condition.
4.
After re-checking your time setting that same seting as our e-mail photo
sent : and
Swich of the auto/manu ON
THE AUTO position (Ref. the below photo 004)
ˇV not manual
STARTING
THE WELDING OPERATION :
1.
Turn
on the power switch which on the right side of the control box. (Ref. the above
photo 009)
2.
Put
your wedling items on the base mold, and use 2 hands to press the ˇĄˇ¨WELD DOWNˇ¨
button
at the 2 side at same time, and release
the ˇ§WELD DOWNˇ¨ button after
press 1 time. The
upper mold will auto
STOP and UP after complete welding.
The machine will not
work if only use 1 hand to press
the WELD DOWN button.
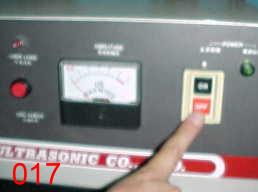
How
to Turn off the machine:
After finished operation the ULTRASONIC MACHINE, turn off
the power SWITCH (Ref.
the below photo 017) Then press the ˇ§OSC. CHECKˇ¨ to release the
sonic energy. (Ref. the below photo 018)

Re-mark
:
1.
When you have operation question, Pls let us now.
2.
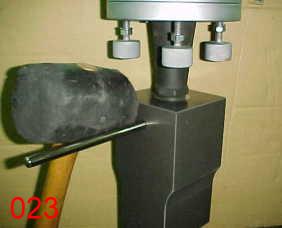
Do not disassembled the ULTRSONIC TRANSDUCER that black color PARTS on
the TOP of the UPPER MOLD. (Ref. the below photo 022,023)
3.
The ultrsonic sound will not
bring the harm for the ear. But, Some people is not
willing to hear this unltrsonic sound. So, Our suggestion is using this machine
in 1 seperated room if it is available. And the anti-noise earphone for worker
is also accepted. But, some makers do not like to wear the hearphone is o.k.
4.
Do not touch the upper mold or base mold when using the ultrasonic
welding operation by the 3rd party , As it may bring the high heat if
use the hand to holding tigthtly the upper mold or base mold while the ULTRSONIC
TRANSDUCER release the high power.
5.
After finished operation the ULTRASONIC MACHINE, turn off the power
SWITCH (Ref. the below photo 017) Then press the ˇ§OSC. CHECKˇ¨ to release the
sonic energy. (Ref. the below photo 018)


 Ultrasonic
Welding Machine enlarge photo
Ultrasonic
Welding Machine enlarge photo
ˇ@
ˇ@
ˇ@
ˇ@